Lets start this blog off easy... MariaDB administration, but more likely the reason you are looking at this is because you don't know what the default password is or when you tried resetting it in DSM it appeared to do nothing.
Welcome to the SynoClub (domain purchased, web site coming). For those who do not want to read the rest of this post the default password is blank, nothing, zilch.
Beginner Administrator
If you are anything like me you installed MariaDB and then went to it in the DSM's programs because... how else would you use it? It didn't prompt me for a password like a normal installation of MariaDB on a linux system... so I assume the first thing I need to do is set the password. I was wrong and right. When you open it up you will see a simple screen:
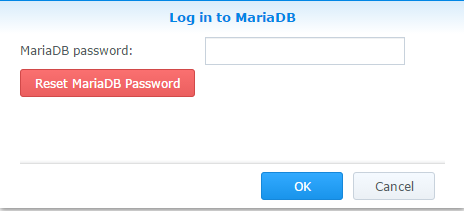
My first thought was to type in the password I wanted and click the Reset Password button. If you do this you will see:
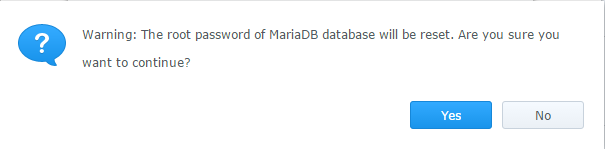
I think, yeah, that is what I want. Turns out that does NOT set the password to whatever you put in the password box. Instead it resets the password back to default... which is blank.
So ... back to the initial screen. This time instead of typing in a password and clicking the Reset Password button, don't type in anything and click the OK button. This will take you to the REAL password reset tool.
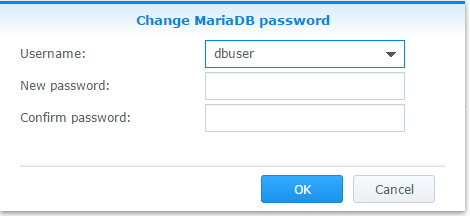
Simple enough right?
Intermediate Administrator
Now that you have set your root password... do you really want all database access to be done through the root account? Your answer should be no but I am not one who thinks there is never a reason to do such a thing. So how do you add users? Well the most common and likely approach would be to install phpMyAdmin. Using the root account you just set the password for you can add users and do other database administration.
In my experience I found only one reason not to do it this way. That reason is because phpMyAdmin is a popular target among hackers and malicious software. When you install it on the Synology you are exposing it on the web server. That isn't really an issue if you aren't going to have your Synology Web Server (Station) publicly exposed. Matter of fact if you aren't going to have your web station publicly exposed I would highly suggest using phpMyAdmin or SQLBuddy.
There is another way to utilize phpMyAdmin without exposing your Synology Web Station which is to run it on another web server and simply open the database ports up on the Synology Firewall but I do not cover that here.
Advanced Administrator
In my case the web station is exposed (including this site) so I choose not to go with phpMyAdmin. What does this leave? It leaves me with the command line. For anyone who uses MSSQL and other Query Languages doing line by line commands isn't new or unusual. But to people used to Graphical User Interfaces (GUI - i.e. Windows vs DOS) it can be confusing and tedious. I can't help you with the latter but I can try to at least give you the simple commands to get you up and running.
Before you can use the command line you need to follow the instructions in my previous post for SSH Access.
Once you are at the command line you type in mysql -p and it should prompt you for the password you set above.
root@SynoNAS:~# mysql -p
Enter password:
Welcome to the MariaDB monitor.  Commands end with ; or \g.
Your MariaDB connection id is 46
Server version: 5.5.47-MariaDB Source distribution

Copyright (c) 2000, 2015, Oracle, MariaDB Corporation Ab and others.

Type 'help;' or '\h' for help. Type '\c' to clear the current input statement.

MariaDB [(none)]>
Creating a User
At this point you should add a new user. The way MySQL user access works is using a combination of name, password and/or source host. Source host usually is an IP address. Not all are required though. As an example you could have a user using a specific password access databases from any source host using an wildcard (%) or you could have a user using NO password access specifically from localhost (127.0.0.1). This is done by typing CREATE USER username@ipaddress; for user without password and for a user with password you would type CREATE USER username@ipaddress INDENTIFIED BY 'password';
User with NO Password on Local Host
MariaDB [(none)]> CREATE USER DBAppID@127.0.0.1;
Query OK, 0 rows affected (0.80 sec)
User with password from specific IP
MariaDB [(none)]> CREATE USER jasonpaw@192.168.1.16 IDENTIFIED BY 'secretpass';
Query OK, 0 rows affected (1.21 sec)
User with password from an entire subnet
MariaDB [(none)]> CREATE USER 'readonly'@'10.0.0.%' IDENTIFIED BY 'nochanges';
Query OK, 0 rows affected (0.64 sec)
You may have noticed the last one has single quotes around the user name and host. This is because I chose to use a wildcard. You would have to do the same thing if you put special characters into the name such as dashes. It is actually better if you just put the quotes in all the time and then you don't have to worry about syntax.
Note: I have to mention that this is just one series of steps. You can do these steps in several different orders... as an example, you don't HAVE to create a user account first. You can actually do that when creating a database.
These next and final steps are very simple... and basically all you need to get going.
Creating a Database
MariaDB [(none)]> CREATE DATABASE synoblog;
Query OK, 1 row affected (0.00 sec)
Granting access to the new Database
MariaDB [(none)]> GRANT ALL PRIVILEGES ON synoblog.* to 'jasonpaw'@'localhost' identified by 'secretpass';
Query OK, 0 rows affected (0.04 sec)
Connect to the Database
MariaDB [(none)]> USE synoblog;
Database changed
Build Database Structure
MariaDB [synoblog]> CREATE TABLE mailinglist(ID int, email varchar(128));
Query OK, 0 rows affected (0.07 sec)


MariaDB [synoblog]> INSERT INTO mailinglist VALUES (1,'jason@synoblog.com');
Query OK, 1 row affected (0.01 sec)
View the Results
MariaDB [synoblog]> SELECT * FROM mailinglist;
+------+--------------------+
| ID   | email              |
+------+--------------------+
|    1 | jason@synoblog.com |
+------+--------------------+
1 row in set (0.00 sec)
References
https://mariadb.com/kb/en/mariadb/create-database/
https://mariadb.com/kb/en/mariadb/grant/
https://stackoverflow.com/questions/5016505/mysql-grant-all-privileges-on-database
https://mariadb.com/kb/en/the-mariadb-library/configuring-mariadb-for-remote-client-access/
https://www.alterlinks.com/mysql/mysql-password.php (I put this here because I ran into a problem with a password so I manually replaced the MySQL user password using this generator.)