The Synology NAS Experience

Simple No Auth Share Access (aka Guest)

Some of the work I do builds tools to automate processes. Mainly using scripts... and then sometimes those scripts are fed into other tools. Large corporations run tools like FireEye, McAfee EPO, Tanium, etc... and these tools have the ability to perform tasks based on input such as a script.

One of those things you might want to do with a script is to collect data based on an event. So take FireEye as an example: FireEye detects a callback (this is malware trying to talk) and sends a command to the computer to run a NETSTAT output to a file and then copy the file to a network location. The NAS would be that location... but scripting can get complicated when trying to also perform interactive logins.

So there are some reasons to have shares available that are not locked down.

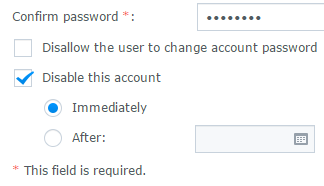
This issue is very straight forward. When you create your shares or edit them after they are created you need to check the access for Guest.

undefined

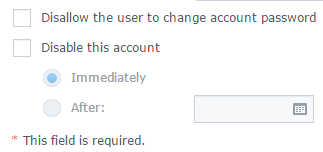
I thought that was it and had issues because I forgot the other most important step. I should have said to do this first but this is how troubleshooting works... the most important is usually the last thing we try. You MUST enable the Guest account by un-checking the Disabled box. DO NOT CHANGE THE PASSWORD.

undefinedundefined

That is it. Super simple.


Reference

https://forum.synology.com/enu/viewtopic.php?p=167925#167925


Package Installation Issues with mySQL

Well the latest issue to emerge occurred when I was trying to install a program for parsing web pages into RSS feeds. Two of these programs... Tiny Tiny RSS and Selfoss both asked for the mysql root account password. However, assuming it knew mysql was actually mariadb I tried the normal passwords and none of them worked.

After some quick research I found that possibly sometime during the version 6 updates some of the apps broke because the link to the mysql executable was broken. Since that was the case the link had to be fixed and was fairly easy.

First thing is to log in to a command line using the method published here

Once you are logged in as root then run the following commands:

root@SynoNAS:~# mkdir /usr/syno/mysql
root@SynoNAS:~# mkdir /usr/syno/mysql/bin 
root@SynoNAS:~# ln -s /usr/bin/mysql /usr/syno/mysql/bin/mysql

Problem fixed!


Research Links: https://github.com/SynoCommunity/spksrc/issues/2136


What does a Synology NAS do that my partner doesn't?

Synology introduced an Intrusion Prevention System(IPS) application recently which is exciting! At least for an IT Security professional such as myself who has worked for many very, very large companies that don't have IPS to this day. I used this point during a conversation with a colleague to try and get him to spend some money for a Synology instead of doing something for his upcoming wedding. This became an inside joke.

So, why might I choose a Synology NAS over a partner? I am going to call her Sylo.

  1. Sylo has an awesome memory! Mine is horrible so when I can't remember I can ask Sylo to remind me.
  2. Sylo treats my stuff as if it were her own. She is protective of the material things I love in life and watches over them night and day.
  3. Sylo shares a passion of creativity with me. Together we create media and share it with the world.
  4. Sylo is a nerd at heart. She loves comic books and comic book movies and video games.
  5. Sylo is also a professional. She is logical. Flexible yet controlled. Open minded but cautious. FOCUSED on the jobs at hand.
  6. Sylo is almost never late. 99.999% of the time.
  7. Sylo works out regularly. She is in great shape and has an 8-pack.
  8. Sylo keeps it interesting. She is always sharing new ideas with me that I can choose to do whenever I want.
  9. Sylo cares about what I think and doesn't worry about politics or finances.
  10. Sylo is quiet. 'nuf sed

Starting Over from Scratch

One of my smaller Synology's seems to be having some strange connectivity issues all of the sudden. I cannot connect to it via SMB/NBT any more even though the firewall clearly allows it and it will not longer send emails via the notification settings. Normally I would troubleshoot this but today I'd rather see if I can reinstall the DSM OS without affecting my 16TB of data.

The reason this is going to be a short post is because the process is simple and already documented at https://www.synology.com/en-us/knowledgebase/DSM/tutorial/General/How_to_reset_your_Synology_NAS

Currently this Synology 1815+ is running DSM 5.2 and I would like to go to DSM 6.0. I will be posting more about the issues with going to DSM 6.0 later but I can tell you that it handles virtual web sites WAY WAY better than DSM 5.x almost to the point where you no longer need HAPROXY.

Update: I decided I was going to take the plunge and move my main NAS (1815+) from DSM 5.2 over to DSM 6. I have already done this once on my baby NAS (which runs this site) and other than some Mono package issues it was about as rough as expected. Not everything came over doing a straight upgrade. Because of this I decided to do a fresh install of DSM 5 and then do an upgrade to DSM 6 without any packages or configurations to complicate the process.

To do this the question is, how do I reinstall the operating system without destroying my massive amount of data? Luckily Synology has an answer. Not the best answer, but an answer. You can find the instructions in the link below.

https://www.synology.com/en-us/knowledgebase/DSM/tutorial/General/How_to_reset_your_Synology_NAS

Basically you hold down the Reset button for 4 seconds, let go for 2 seconds, hold down for 4 seconds again. This resets to factory default WITHOUT touching your data. This also means that your application data from old applications are still on the volumes you chose to install them on so some applications such as MariaDB will get loaded back on and be just like before version 6.

------------

For the most part version 6 has been much better. Performing the upgrade had no impact on my data however I am a bit OCD so I re-organized all my data any ways when I went from 16TB to 40TB. 

Synology is clearly trying to head more towards corporate customers than home consumers with things such as their Presto File App and other subscription based apps.

The biggest losses I found going from version 5 to 6 where:

  1. No more VirtualBox in the App Store
  2. Limited support for Plex
  3. IDS/IPS was here and then was gone.

It isn't that big of a deal though. You still have DOCKER which means you can run VirtualBox in a Docker. You can also run lots of IDS/IPS type of systems such as Bro so that isn't a requirement but it was nice to see the logging go into Log Center... which you can still also do with some configuration tweaks. And Plex still works even though it isn't supported.

Command Line Administration

Most people who own Synology NAS appliances will probably only utilize the DiskStation Manager (DSM)'s interface. However for those who like CLI administration and are used to it from using *nix Synology supports that as well. There are a lot of files and information that are hidden from the DSM view. If you ever have an issue running a package you most likely will not resolve it WITHOUT using the command line.

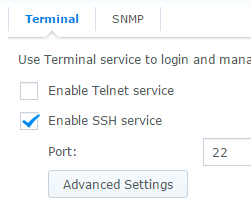
You need to configure SSH access in the control panel. If you go into the control panel you are looking for Terminal & SNMP.

undefinedundefined

Couldn't find it? It is considered an advanced option so you have to click the Advanced Mode link to display the icon.

undefined

Once you have it open you need to check the box next to Enable SSH service and click OK.

undefined


Ok, so up until this point everything is the same between DSMv5 and DSMv6. Now the differences begin...

Logging In As Root

Version 5 - Using a SSH client such as PuTTy connect to your Synology on the port you set in the control panel. Login as root and use the same password as what you have for the admin account.

Version 6 - This version added some additional security so it doesn't allow a direct SSH login using the root account. In more advanced topics we will talk about how to change this but for now we can still do everything we need to do by logging in with the admin account (or any account in the administrators group). Then once logged in you can switch user over to the root account in order to complete any required administration. Type this command and when prompted put in the password for the admin account you logged in with.

admin@SynoNAS:~$ sudo su -
Password:
root@SynoNAS:~#


Using my clairvoyance I know I will refer to this process many times in my future posts. 

MariaDB Administration

Lets start this blog off easy... MariaDB administration, but more likely the reason you are looking at this is because you don't know what the default password is or when you tried resetting it in DSM it appeared to do nothing.

Welcome to the SynoClub (domain purchased, web site coming). For those who do not want to read the rest of this post the default password is blank, nothing, zilch.

Beginner Administrator

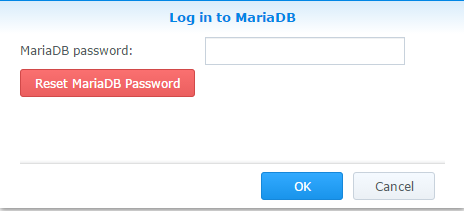
If you are anything like me you installed MariaDB and then went to it in the DSM's programs because... how else would you use it? It didn't prompt me for a password like a normal installation of MariaDB on a linux system... so I assume the first thing I need to do is set the password. I was wrong and right. When you open it up you will see a simple screen:
undefined


My first thought was to type in the password I wanted and click the Reset Password button. If you do this you will see:

undefined

I think, yeah, that is what I want. Turns out that does NOT set the password to whatever you put in the password box. Instead it resets the password back to default... which is blank.

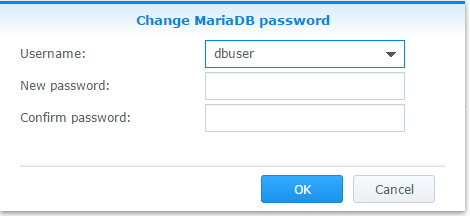
So ... back to the initial screen. This time instead of typing in a password and clicking the Reset Password button, don't type in anything and click the OK button. This will take you to the REAL password reset tool.
undefined

Simple enough right?


Intermediate Administrator

Now that you have set your root password... do you really want all database access to be done through the root account? Your answer should be no but I am not one who thinks there is never a reason to do such a thing. So how do you add users? Well the most common and likely approach would be to install phpMyAdmin. Using the root account you just set the password for you can add users and do other database administration.

In my experience I found only one reason not to do it this way. That reason is because phpMyAdmin is a popular target among hackers and malicious software. When you install it on the Synology you are exposing it on the web server. That isn't really an issue if you aren't going to have your Synology Web Server (Station) publicly exposed. Matter of fact if you aren't going to have your web station publicly exposed I would highly suggest using phpMyAdmin or SQLBuddy.

There is another way to utilize phpMyAdmin without exposing your Synology Web Station which is to run it on another web server and simply open the database ports up on the Synology Firewall but I do not cover that here.


Advanced Administrator

In my case the web station is exposed (including this site) so I choose not to go with phpMyAdmin. What does this leave? It leaves me with the command line. For anyone who uses MSSQL and other Query Languages doing line by line commands isn't new or unusual. But to people used to Graphical User Interfaces (GUI - i.e. Windows vs DOS) it can be confusing and tedious. I can't help you with the latter but I can try to at least give you the simple commands to get you up and running.

Before you can use the command line you need to follow the instructions in my previous post for SSH Access.

Once you are at the command line you type in mysql -p and it should prompt you for the password you set above.

root@SynoNAS:~# mysql -p
Enter password:
Welcome to the MariaDB monitor.  Commands end with ; or \g.
Your MariaDB connection id is 46
Server version: 5.5.47-MariaDB Source distribution

Copyright (c) 2000, 2015, Oracle, MariaDB Corporation Ab and others.

Type 'help;' or '\h' for help. Type '\c' to clear the current input statement.

MariaDB [(none)]>


Creating a User

At this point you should add a new user. The way MySQL user access works is using a combination of name, password and/or source host. Source host usually is an IP address. Not all are required though. As an example you could have a user using a specific password access databases from any source host using an wildcard (%) or you could have a user using NO password access specifically from localhost (127.0.0.1). This is done by typing CREATE USER username@ipaddress; for user without password and for a user with password you would type CREATE USER username@ipaddress INDENTIFIED BY 'password';

User with NO Password on Local Host

MariaDB [(none)]> CREATE USER DBAppID@127.0.0.1;
Query OK, 0 rows affected (0.80 sec)

User with password from specific IP

MariaDB [(none)]> CREATE USER jasonpaw@192.168.1.16 IDENTIFIED BY 'secretpass';
Query OK, 0 rows affected (1.21 sec)

User with password from an entire subnet

MariaDB [(none)]> CREATE USER 'readonly'@'10.0.0.%' IDENTIFIED BY 'nochanges';
Query OK, 0 rows affected (0.64 sec)

You may have noticed the last one has single quotes around the user name and host. This is because I chose to use a wildcard. You would have to do the same thing if you put special characters into the name such as dashes. It is actually better if you just put the quotes in all the time and then you don't have to worry about syntax.

Note: I have to mention that this is just one series of steps. You can do these steps in several different orders... as an example, you don't HAVE to create a user account first. You can actually do that when creating a database. 

These next and final steps are very simple... and basically all you need to get going.

Creating a Database

MariaDB [(none)]> CREATE DATABASE synoblog;
Query OK, 1 row affected (0.00 sec)

Granting access to the new Database

MariaDB [(none)]> GRANT ALL PRIVILEGES ON synoblog.* to 'jasonpaw'@'localhost' identified by 'secretpass';
Query OK, 0 rows affected (0.04 sec)

Connect to the Database

MariaDB [(none)]> USE synoblog;
Database changed

Build Database Structure

MariaDB [synoblog]> CREATE TABLE mailinglist(ID int, email varchar(128));
Query OK, 0 rows affected (0.07 sec)


MariaDB [synoblog]> INSERT INTO mailinglist VALUES (1,'jason@synoblog.com');
Query OK, 1 row affected (0.01 sec)

View the Results

MariaDB [synoblog]> SELECT * FROM mailinglist;
+------+--------------------+
| ID   | email              |
+------+--------------------+
|    1 | jason@synoblog.com |
+------+--------------------+
1 row in set (0.00 sec)


References
https://mariadb.com/kb/en/mariadb/create-database/
https://mariadb.com/kb/en/mariadb/grant/
https://stackoverflow.com/questions/5016505/mysql-grant-all-privileges-on-database
https://mariadb.com/kb/en/the-mariadb-library/configuring-mariadb-for-remote-client-access/

https://www.alterlinks.com/mysql/mysql-password.php (I put this here because I ran into a problem with a password so I manually replaced the MySQL user password using this generator.)

Initial implementation of Mail Plus Server

So if you are seeing this you probably know that Synology has released a second version of their mail server. Synology used to have a general Mail Server and used RoundCube as the web interface for that mail server package. I was excited because I happened to be moving 5 of my email domains from CoLos to MyLos at this time. 

First thing I should mention is that I do not see this package available for the DS214 so I assume it is for Enterprise class only.

Most of the mail server functionality is the same between the previous mail server edition and the new Mail Plus Server. As an example both have the same security features such as content filtering, anti-virus and anti-spam engines. Same basic functionality too with Aliases and AutoBCC.

Of course they improved and added features as well. This main portal is better and this Mail PLUS Server is able to monitor other Mail Plus Servers. Although one of the best additions is their implementation of DLP. I spent a year of my life working on DLP and it has always been targeted at large corporations. It is normally fairly expensive so this is awesome. Especially for those out there using these on small businesses.

Also the logging dramatically improved as well as the configuration for logging. 

So far the only drawback I found is the licensing module built in. It only allows for five accounts free.

Issues

Adding SpamAssassin Rules is a manual process.

For those who don't know what SpamAssassin is... think Snort for Email. For those who don't know what Snort is... it is an Intrusion Detection System based on rules in flat (text) files. SpamAssassin operates the same way... as emails come in they run against quite a few rule files. There are currently 58 of those files which means that you have to manually upload/add each one. Boo. This was also an issue with original Mail Server but at that time I had not played with Mail Server that much.


Security Log Corruption

I actually put in a support ticket for this and am still waiting for a response. I noticed an update to Mail Plus Server today so maybe they address it but I found that if you want to clear your logs the application no longer parses the logs correctly and you begin to get date/time stamps in the Source field and Source in the Target field.


UPDATE: This is an older post. I meant to finish it but by the time I got back to it they had upgraded their mail products once again and I have not had the time to go through them.

Welcome to the Synology NAS Experience

Hello! People call me Jason. I am an IT Security professional who happened to choose Synology NAS appliances for a fortune 500 company and through doing so fell in love with them. The NAS's, not the company. 

Because of this I purchased my own Synology NAS's and had a good friend of mine get one as well. So in the end I am the administrator for the following:

1 X DS214
1 X DS415+
2 X DS1812+
4 X DS1815+


Most of which currently run DiskStation Manager (DSM) version 5 with the exception of the NAS running this web site which is currently running DSM version 6 RC.

Update (May 2016): All NAS's except for the DS415+ have been upgraded to DSM 6.

Since I am constantly maintaining, designing and building these systems I am always running into issues that require research time for troubleshooting. I thought it would be a good idea to share what I learn here with the rest of the world using the product the blog is about.

I am not an english major and have been using computers for communications so long that I type how I talk. With that said, Enjoy your burrito!

Jason Paw

Home